Click here to order a Simple Pump
Be sure to Contact Us if you have any questions about this guide!
To view the video guide, click here.
Warning!
1. PUT THE TOP DROP PIPE ASIDE TO BE INSTALLED LAST
The top drop pipe MUST be installed last. It is marked four different ways.
(The only exception is if your frost line is more than 9’ down. Then it goes second from the top.)
2. DO NOT USE ANY KIND OF LIQUID SEALANT/PIPE DOPE
This can drip and interfere with pump operation. Use teflon tape. See page 5.
3. DO NOT OVER-TIGHTEN.
4. PAY CAREFUL ATTENTION TO EVERYTHING MARKED Warning, Caution, or Note.
5. If you are a homeowner, you MUST have a helper for any installation.
Tools Needed:

- Allen wrench set (English, not metric)
- 2 channel locks: to grip 1-3/4” outer diameter PVC pipe
- 2 vise grips
- Roll of Teflon tape
- Bleach/water: 1 part bleach to 20 parts water.
- Wire cutters, strippers (if installing alongside an existing submersible pump)
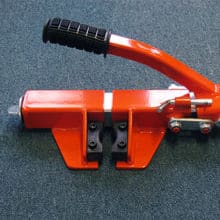
- A Kwik Klamp (Available below) if lifting an existing submersible pump up to change the well cap.
-
 Kwik Klamp 1 – Pipe Clamp$296.00
Before Installation
You have to raise the submersible pump up to replace the well cap. Depending on the well cap type, there are a few ways to do this. If you have a standard well cap, you can usually disconnect the pipe coming from the submersible pump with the threaded coupling. Watch the video at the bottom of this guide so that you can see how in detail.
1. Tighten the Pump Cylinder Assembly to the first drop pipe and sucker rod combination.
Use a drop pipe that does not have weep holes. The last pipes have marks to show the weep holes. Connect the sucker rod to the pump cylinder assembly with vise grips.

2. Apply 3 wraps of teflon tape to the drop pipe and connect it to the cylinder assembly
Remove the protective cap, then apply teflon tape to the male threaded end of the drop pipe. Hand tighten the drop pipe and the cylinder assembly together. Take the channel locks and tighten one half turn past hand tight. Pipe wrench tightening is not necessary. NEVER use a liquid sealant (like pipe dope or TruBlu). You should wrap the teflon in the direction that you turn the pipe.

3. Insert the pump cylinder into the well cap
Be sure to loosen the bolts on the split flange, so that the pipes can slide in freely. There are 3 mounting bolts and a bolt holding the flange together. These should be loosened and not removed. The split flange is mounted to the well cap. Be sure to use the safety tool to keep the pipes from falling into the well. (That would be a bad day)


4. Place a rod-guide over the sucker rod and thread the second pipe in
It is highly recommended that you place the rod into the pipe before attempting to thread the rods together. This makes the process much easier.
Be sure to keep the pipe rod 5 inches above the pipe end so that you can thread the next pipe rod in. Tighten the rod with vise grips or channel locks. Be careful not to over-torque the rods together. Tighten them until they are shoulder to shoulder.
Be sure also to put rod guides on every rod at the top. This is so that the rods don’t get caught inside the pipes.

Be sure to apply 3 wraps of teflon tape as always. Repeat this process for all the pipes. Remember to hand tighten the pipes and go one half turn past hand tight.
You can lift up the safety tool after you have tightened the second pipe into the first one, then place the tool back on after clearing the pipe’s bell end.
Don’t forget that the final pipes have weep holes so that they won’t freeze.
If you are installing more than 12 drop pipes, you will receive a T-Handle assist tool with your order. Use this tool when the pipes begin to get heavy, so that you can lower the pipe on to the safety tool with ease.

5. Install the stainless steel nipple provided with the pump.
Be sure to teflon both ends separately so that the teflon won’t unwind when you thread it.

The rod should be 5 inches above the stainless nipple at this point. If it is higher because of a very long pipe configuration, the longer nipple can be used.
At this stage, you will also need to make sure you are in water. You can check this by moving the last rod up and down. If it feels like it is moving air, don’t attempt to pump it.
6. Thread the 3/4″ stainless pump rod to the pipe rod.

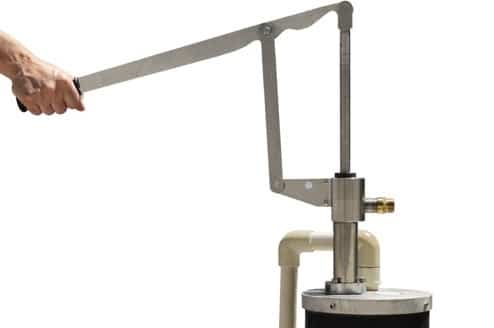
7. Install the riser tube and pump head
Put a teflon tape on the bottom of the riser tube. Tighten it on to stainless steel nipple.

8. Lower the pump head into the well after removing the safety tool.
The ideal pump height is about 8 inches above the well. Lower it to your desired level and tighten the split flange so that the pump head assembly does not move. Retighten the three mounting bolts.
9. Assemble the lever link arm and bracket assembly.
The easiest way to do this is by placing it onto a flat surface so that you can place the shims in easily.
Arrange the two parts as they are in the picture below. Then slide the two brass shims on both sides of the hole where the two parts meet. Afterwords, straighten the brass shims so that the pin can go through. You can also put one shim in first, then place the pin in part way so that it is easier to put the second shim in.

10. Begin to thread the handle assembly to the top of the pump rod.

This is left handed threading, so make sure you go counter-clockwise. After this, you can bring your lever arm into the correct position so that it can be mounted.
You may need to lift up on the pump rod slightly in order to get the lever arm into position for mounting.

You can hand tighten the 4 screws into the lever arm for now, then you can tighten them all with the Allen wrench.
11. Install the 3/4″ nipple into the pump head assembly.

Depending on how you ordered your pump, there may be additional steps. So, if you have a check valve assembly, place that on the well, and apply teflon tape accordingly. You can use any liquid pipe thread on the exterior plumbing because it is not on the drop pipes.
Let us know if you have any questions about this guide. Ff you are interested in ordering the Simple Pump, get a quote below: